
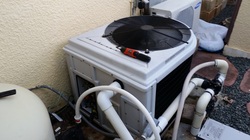
Heat Siphons are a common Heat Pump used for heating water in pool and spa applications. When a Heat Siphon goes out or is not functioning properly there are some steps to take when troubleshooting. The following steps can be found on the back of the access panel but without the explanation.
- “CHECK FOR COLD AIR”
- When the Heat Siphon is on and running but it’s not certain that its heating the water, put your hand above the unit to feel the temperature of the air being blown out. The air being blown out of the top of the Heat Siphon should be 5 – 10 degrees colder than the air surrounding the unit. This will tell you that the heat pump is removing the heat from the surrounding air and transferring it to the water in the pool or spa.
- When the Heat Siphon is on and running but it’s not certain that its heating the water, put your hand above the unit to feel the temperature of the air being blown out. The air being blown out of the top of the Heat Siphon should be 5 – 10 degrees colder than the air surrounding the unit. This will tell you that the heat pump is removing the heat from the surrounding air and transferring it to the water in the pool or spa.
- “CONFIRM WATER FLOW”
- If the Heat Siphon is on and pushing out cold air, make sure there is adequate water flowing through the unit. If there isn’t, you have found your problem. The Heat Siphon has a water pressure switch that turns the unit on and off if adequate water flow is present or not. Making sure your filter is clean, baskets are empty, and pool equipment is working properly can eliminate water flow as a causing factor.
- If the Heat Siphon is on and pushing out cold air, make sure there is adequate water flowing through the unit. If there isn’t, you have found your problem. The Heat Siphon has a water pressure switch that turns the unit on and off if adequate water flow is present or not. Making sure your filter is clean, baskets are empty, and pool equipment is working properly can eliminate water flow as a causing factor.
- “CHECK CIRCUIT BREAKER”
- This is a pretty obvious step but still needs to be said. If the Heat Siphon is not turning on at all, check the circuit breaker. Turn it all the way to the “off” position and then turn it back “on” again.
- This is a pretty obvious step but still needs to be said. If the Heat Siphon is not turning on at all, check the circuit breaker. Turn it all the way to the “off” position and then turn it back “on” again.
- “CHECK POWER SUPPLY”
- If the Heat Siphon is not turning on and the circuit breaker is in the “on” position, check to make sure you are getting adequate voltage on the power supply. In most cases you should be getting 240v coming into the unit. Break out your meter and make sure you have that.
- If the Heat Siphon is not turning on and the circuit breaker is in the “on” position, check to make sure you are getting adequate voltage on the power supply. In most cases you should be getting 240v coming into the unit. Break out your meter and make sure you have that.
- “CHECK TRANSFORMER”
- The transformer is located inside the access panel with all the control switches. Check to make sure you have the proper voltage coming in to the transformer. If proper voltage is coming in to the transformer check to make sure it is spitting out the proper voltage. This should be 24 volts. To check that the transformer is spitting out the correct voltage you first need to find the output. The output of the transformer is on the left side of the Contactor and will usually have a yellow wire attached to it. Place your meter there and check to see you are getting 24v.
- The transformer is located inside the access panel with all the control switches. Check to make sure you have the proper voltage coming in to the transformer. If proper voltage is coming in to the transformer check to make sure it is spitting out the proper voltage. This should be 24 volts. To check that the transformer is spitting out the correct voltage you first need to find the output. The output of the transformer is on the left side of the Contactor and will usually have a yellow wire attached to it. Place your meter there and check to see you are getting 24v.
- “CHECK CONTROL SWITCHES”
- If you are getting the proper voltage thus far then usually your problem is located in one of the control switches weather it is one of the switches itself or the switch turning off because one of the requirements needed for that switch to work is not present.
Most of the parts in these units are wired in a series or daisy chain. Therefore, most parts will have power coming into the part, and if the part is working as expected, there will be power exiting that part going to the next. This tells us that we can test the power into and out of the parts in the chain to see where it breaks. To troubleshoot this we need to take it one step at a time.
- CONTACTOR / TRANSFORMER
- On the contactor there are 2 main lines coming in. On the left side there is a small wire coming out which is usually yellow. This is the start of the chain. Put your meter here to make sure 24v is coming out.
- On the contactor there are 2 main lines coming in. On the left side there is a small wire coming out which is usually yellow. This is the start of the chain. Put your meter here to make sure 24v is coming out.
- CONTROL KNOB
- You can follow the yellow wire to the control knob. This is where a user can set the temperature by spinning a knob. When the knob is turned all the way down you can turn it up. When it hits a certain point it will hear a click. If the knob is turned above the existing water temperature it should put out 24v. Turn the knob all the way up and you should be able to read outgoing voltage. If you can’t, replace the knob unit.
- You can follow the yellow wire to the control knob. This is where a user can set the temperature by spinning a knob. When the knob is turned all the way down you can turn it up. When it hits a certain point it will hear a click. If the knob is turned above the existing water temperature it should put out 24v. Turn the knob all the way up and you should be able to read outgoing voltage. If you can’t, replace the knob unit.
- WATER PRESSURE SWITCH
- The water pressure switch is next in line. You should be reading correct voltage going in. With the pool or spa pump turned on and water flowing, a little button should be pressed up hitting the switch. If the switch is being hit, voltage should then be passed along the chain. If the switch is being hit but voltage is not going out, replace the water pressure switch.
- The water pressure switch is next in line. You should be reading correct voltage going in. With the pool or spa pump turned on and water flowing, a little button should be pressed up hitting the switch. If the switch is being hit, voltage should then be passed along the chain. If the switch is being hit but voltage is not going out, replace the water pressure switch.
- LOW PRESSURE SWITCH
- The low pressure switch is the refrigerant suction. This should not be activated and should pass voltage to the high pressure switch.
- The low pressure switch is the refrigerant suction. This should not be activated and should pass voltage to the high pressure switch.
- HIGH PRESSURE SWITCH
- The high pressure switch is on the pressure side of the refrigerant. This should not be activated and should pass voltage to the time delay. If the high or low pressure switch is not passing a long voltage then check the pressure of the refrigerant. If pressure is correct, then replace the switch.
- The high pressure switch is on the pressure side of the refrigerant. This should not be activated and should pass voltage to the time delay. If the high or low pressure switch is not passing a long voltage then check the pressure of the refrigerant. If pressure is correct, then replace the switch.
- TIME DELAY
- The time delay will accept voltage in, hold it for 5 minutes and then pass it along. If it is not passing the voltage on, replace the time delay You can bypass the time delay to test if the unit will turn on and heat water without it.
- The time delay will accept voltage in, hold it for 5 minutes and then pass it along. If it is not passing the voltage on, replace the time delay You can bypass the time delay to test if the unit will turn on and heat water without it.
- CONTACTOR
- After the time delay the wire should go back to the contactor. This time, you should have a correct voltage reading on the right side of the contactor and the Heat Siphon should be working.
- After the time delay the wire should go back to the contactor. This time, you should have a correct voltage reading on the right side of the contactor and the Heat Siphon should be working.
- CONTACTOR / TRANSFORMER
- If you are getting the proper voltage thus far then usually your problem is located in one of the control switches weather it is one of the switches itself or the switch turning off because one of the requirements needed for that switch to work is not present.
 RSS Feed